Everything You Need to Know About Laminate Flooring

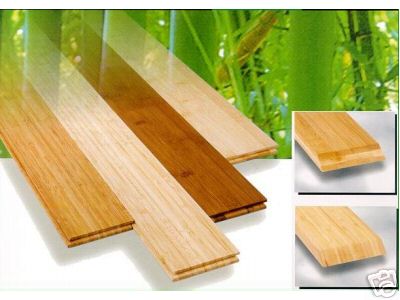
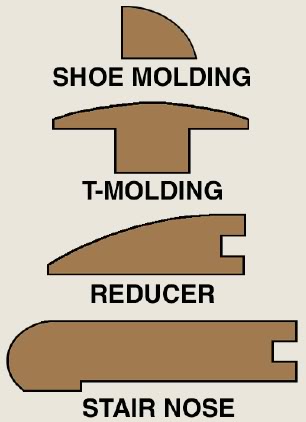
1. What is Laminate Flooring?

Laminate flooring is a popular flooring solution which has itsorigin as a humble kitchen countertop material in Europe. It was introduced in North America about 2 decades ago and the brand Pergo quickly became a household name.

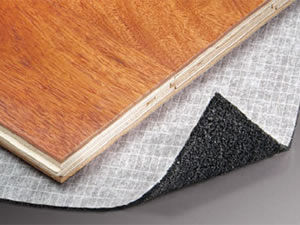
Laminate is technically made up of several layers with a wood veneer, thick polyurethane finished top layer and moisture resistant back layer.

These type of flooring materials are designed to mimic wood surface and better deal with moisture and humidity.

Over the years, laminate flooring products have also seen major innovations, from different sizes, thickness, installation methods and surface finishes.

2. How is Laminate Flooring Made

Laminate flooring is made up of several layers pressed together. These layers are:

  • the stabilizer layer is made up of moisture-resistant materials like resin or melamine, it is the bottom layer that provides support to each plank;

  • the core layer – made up of resin re-enforced fiber boards, this is the layer which supports the weight from foot traffic;

  • the decor layer is where patterns or designs are printed; and

  • the wear layer or overlay is the topmost and extremely tough layer that comes in constant contact with traffic, this is made up of either aluminum oxide or melamine.

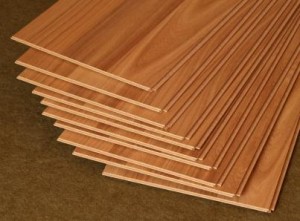
3. Types of Laminate Flooring

There are several ways we can classify laminate flooring. One of them is how they are made. There are generally 2 ways of making laminate flooring and they are:

  • Direct Pressure Laminate (DPL) is said to be the standard process in making laminates, here, 4 layers of laminate flooring materials are pressed and bonded together at 300-600 pounds per inch of pressure at a temperature of somewhere in between 300-400  degrees Fahrenheit. Materials are treated and pressed together all in the same time.

  • High Pressure Laminate (HPL) here, the pressure is increased to 1,000lbs/inch. This is to make the laminate flooring more resilient to traffic. Compared to DPL processed laminates, here there are 5 or more layers of materials pressed together. These extra layers are usually high-strength paper to reinforce the product.

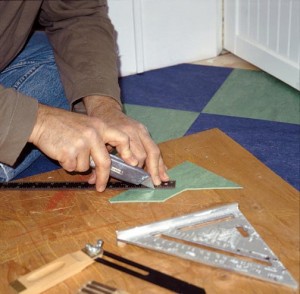
Another would be the finish. Early laminate flooring planks were designed to mimic wood. Patterns of different types of wood grains were printed on the design layer. These days however, we have different surface finishes available, some looking like natural stone. Also, aside from the look, most laminate flooring planks today also imitates the texture of the materials they mimic making it look and feel more authentic.

4. Advantages of Using Laminate Flooring

Laminate flooring has several advantages over other flooring solutions. A big advantage is cost. Compared to traditional hardwood planks or natural stone tiles, you can get laminate flooring at a fraction of the cost. They come in warranties of 10, 15 and even up to 30 years.

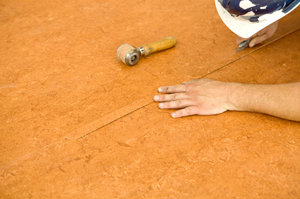
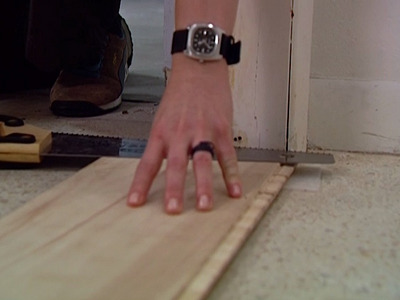
They are lighter than natural stone flooring and very easy to install, you can do it yourself. For stone tiles and even hardwood, you would need special tools to get them cut unlike laminate flooring, all you’ll need is a typical saw.

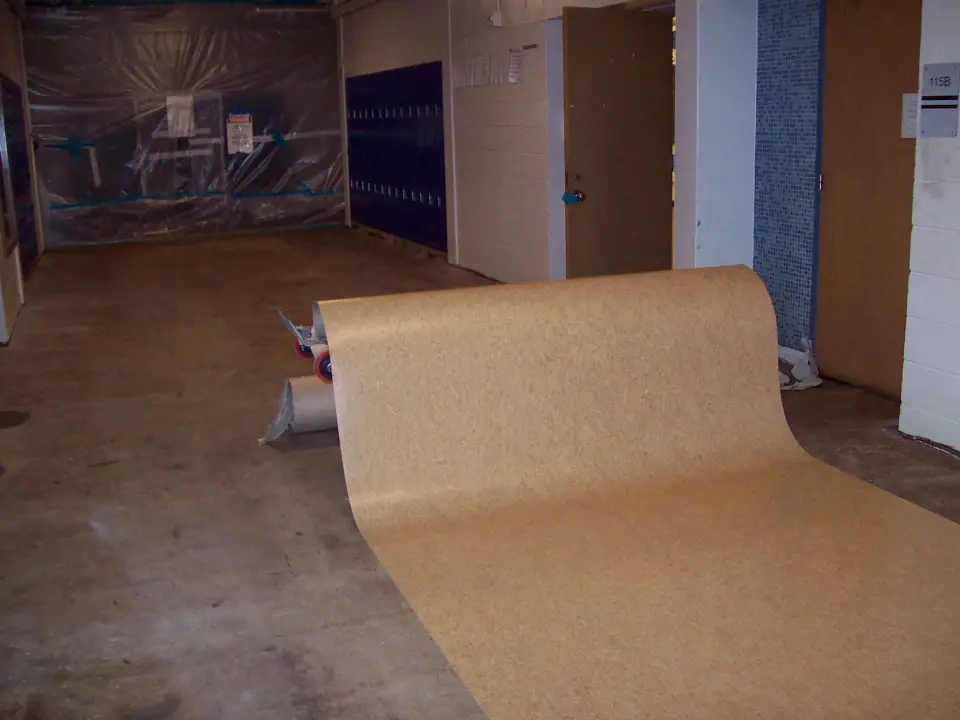
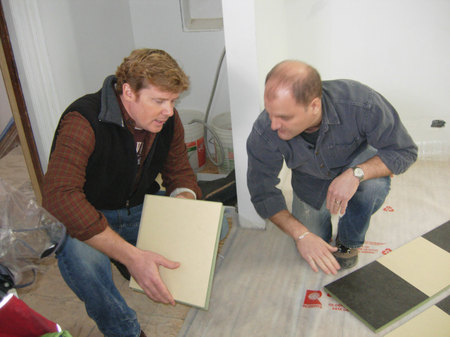
They are easy to clean and low on maintenance, there is no need to refinish or resand laminate floors. Laminate flooring is also easy to install. Some can be bought w/ attached pre-glued underpads and some comes with an easy click and lock system making it easier for DIY enthusiasts.

Compared to wood, they are more resistant to moisture and won’t easily warp or cup.

5. How to  Choose Laminate Flooring?

As we’ve mentioned and as you might already know, there are a variety of options when it comes to laminate flooring – every color, texture and sizes possible to satisfy your imagination.

What I strongly suggest before picking out the right laminate flooring for your needs is to consider how much traffic you expect in each room.

Laminate flooring products all have an Abrasion Class (AC) Rating which identifies its resilience in terms of impact, burns, moisture and other elements which can cause damage.

Eco Friendly Flooring Options

In our previous post, we discussed the harmful elements in some flooring products like VOCs. In this third installment, we’ll take a look a some common flooring solutions and why they are considered eco-friendly.

In recent years, as the rising awareness in preserving the environment and our natural resources gained popular advocacy and support, words like sustainability, renewable resources and reusable materials have become buzzwords that everybody in different social and industrial circles are talking about – some out of genuine concern and others simply out of the publicity.

These days however, this is hardly the case with the recent development in media and improvements in communication, more and more people are becoming genuinely concerned with the environment. Some if not most of us have made an active commitment to use materials or products that does as little or maybe even zero damage to the environment. Most of us are also trying to make intelligent choices when it comes to products used in our homes and the establishments we run or own.

Below is a list of some environment-friendly flooring solution:

Hardwood Flooring.  Yes, you read that one correct. Hardwood flooring can be considered as an eco-friendly flooring choice for a number of reasons. The top reason is: its natural durability combined with proper care can make hardwood last for over a hundred years.

When you get hardwood installed in your home, you can have it treated and refinished again and again and when your grand kids have gone tired of seeing the same floor again and decides to take it out, the wood can be re-used and re-purposed in the same manner that re-claimed woods are such a hot commodity these days, people are willing to splurge for vintaged wood products.

Linoleum. One of my personal favorite  flooring material is linoleum. What most people don’t know is that its a truly green flooring material – made from renewable and biodegradable resource unlike vinyl which is made up mainly of PVC compound.

In recent years linoleum have slowly gotten a well-deserved revival. In general it is manufactured the way its been since it was invented with basically the same components and with modern renovations on the product, it has become more marketable and consumer friendly.

Bamboo. This is an ancient material that has displayed versatility and resiliency for several centuries. Highly durable, ancient civilizations have used bamboo in different ways from education, medicine, construction, arts and weapons.

The trick part about buying bamboo though is ensuring that it was produced with the least chemical emission or environmental damage. One thing to keep in mind when buying this flooring type is to check out the manufacturer and importer of the product.

Cork. Another product that has stood the test of resiliency is cork. This is another material that came from a highly sustainable resource. Hypoallergenic, low on maintenance, a great sound insulator and soft to touch, this is an ideal alternative to traditional carpets.

One thing to watch out for when getting this type of product is the finish, the underlay and the adhesive that will be used because it might contain toxic chemicals.

Natural Stones. Natural stone flooring like granite, marble, slate or travertine are environmentally sound choices since they come from natural resources. Since they are a bit pricey, home or establishment owners look at them as long term investments. Natural stones are not only durable, they can also be exquisitely stunning and they definitely add value to the property.

As I mentioned in the first part of this series, being green doesn’t end with buying green. Being environmentally conscious involves a constant checking and a continuing commitment to reduce one’s own carbon footprint.

DIY Vinyl Flooring Installation

After you have made the essential preparation for your subfloors, its now time to learn more about installing your new vinyl flooring. Continue reading for some pointers on our DIY flooring series.

Before you go right ahead and spread and cut your vinyl plank or sheet flooring, be sure to plan the layout correctly. It is ideal to draw a sketch of the room to make sure you identify every corner you wish to cover. This is also highly advised if you intend to create a pattern on the room. Adding extra inches here and there for cutting and and trimming. This is best done using craft paper as a pattern.

After you’ve laid out the craft paper and created a pattern, it is now easier to identify where and how much to cut from our vinyl flooring material. Also don’t forget to check the flooring manufacturer’s recommendations. While it is generally okay to install vinyl over flooring concrete or wood subfloors, they might need some preparation or perhaps installing an underlayment is necessary.

Again, the type of vinyl flooring you would use would largely determine the installation process.

For vinyl sheet flooring, you would need to temporarily tape the sheet on one side while working oh the rest of the sides – laying and cutting out the material before spreading out the adhesive either for full or perimeter adhesion.

Some vinyl sheet flooring on the other hand requires only limited adhesive as some have the standard tongue and groove that helps it get locked in place immediately while some are those peel back and stick kind, making it more secure and convenient.

Lastly, some vinyl flooring tiles are groutable so you would have to use spacers on them, just like ceramic tiles and probably rent a caulk gun to fill them up, especially if you’re planning to install them in places which gets exposed to either moisture or water.

One thing to remember especially if you’re gonna use groutable vinyl flooring tiles is to keep it clean and clean up quickly as some grouting product tend to dry up fast.

DIY Linoleum Flooring Installation

Done preparing the subfloor, we’ll now proceed to installing out linoleum flooring. First things first, don’t forget to let your linoleum flooring product acclimate to the natural conditions of the room for at least 24 hours.

Continue reading this newest installment on our DIY flooring series and check out if linoleum flooring installation is one project you’d like to do-it-yourself, while it won’t necessarily add value to your home, it can make the living space more functional and more appealing.

Installation will vary depending on the type of linoleum flooring you’re going to use and their respective manufacturers’ instructions.

Linoleum Sheet

For linoleum sheet flooring, If its a simple square or rectangular room, just simply get the room’s area and have an allowance of at least 3 inches on each side. However, if the room’s shape is irregular or has multiple obstacles or stable features and immobile furnishings, the same technique in installing vinyl sheet flooring can be applied here: create a sketch of the room and a pattern using craft paper. The seams, should ideally be located in low traffic areas.

Using a utility knife, carefully cut the sheet according to your pattern, keeping in mind the measurements to make sure that the cut will be a precise fit. Dry lay the linoleum on the floor, also be mindful of the design or pattern you chose – they, of course should match. Seams should have the matching design and should overlap at least one inch. Tape the seams together to hold them temporarily as you continue with the dry layout.

After you’ve spread the entire layout throughout the room, be sure that each side or edge is temporarily held down by tape. You can now proceed to applying adhesive as directed by the manufacturer. Apply pressure using a roller as directed, though this is commonly done by beginning in the center and going to the sides. Seal seams with manufacturer-recommended sealant. Remove visible tapes that were used to secure the linoleum.

Finally, wait for at least 24 hours or as directed before putting furniture back and resuming traffic in the area.

Linoleum Tiles

One thing to remember here is our earlier post on installing ceramic and porcelain tiles. This is especially true if you plan to create a pattern or arrange the linoleum tiles to form a specific design. Be sure to get the center of the room and dry fit the tiles.

To find the center of the room, measure the opposing width of each wall and divide by 2 to get the center. After you’ve found and marked the center, snap a chalk line along. Be sure to check if the lines have a perfect 90º angle using a carpenter’s square. If not, be sure to make the necessary corrections.

Dry lay the tiles, make sure it is perfectly aligned with the chalk line. Arrange each tile to achieve the desired design or pattern. Apply adhesive as recommended and directed by the manufacturer. You can work your way from the center to the side of each wall. Be sure to take correct measurements and cut the linoleum tiles when necessary.

Before the adhesive’s completely dry, roll over tiles with a heavy roller to make sure they lay flat. It also won’t hurt to check if the tiles are leveled as adhesive or other foreign material might cause unwanted humps and bumps on your new floor.

Lastly, re-attach all trimmings, mouldings and baseboards to the walls to cover the edge of the tiles. Also check if there is a need to keep an allowance for expansion as this may vary depending on the product you use and the manufacturer’s instructions.

Glueless Linoleums

Be sure to clean the surface of the subfloor, measure the room and mark the each side of the wall for the expansion gap, as recommended by the manufacturer. It’s better if you can snap a chalk line here as your guide or reference.

Just like typical laminate or hardwood flooring boards, lay down the glueless linoleum with the tongue facing the wall, just dry lay them and don’t lock them together yet.

For the first row, saw off the tongue facing the wall before locking it together with the rest of the glueless linoleum boards. Cut boards as needed.

DIY Laminate Flooring Installation Part 1

We’ve already written some posts on laminate flooring – what they are, how to choose the perfect laminates, gave a buying guide as well as how to clean and handle stains in them.

You may think that you’ve got everything you need and know absolutely everything you need to know about them and you’re probably about to go online or hit the nearest retailer in your area to get boxes and boxes of your perfect laminate flooring of choice…but you thought of something and stopped on your tracks: you realized you don’t know anyone who can install it and you’re not sure if you can do it.

Well we today, we give you the basics on how to install laminate flooring.

The most important thing to do before you begin is to make sure you have all the materials and tools you need. Common tools are:

  • saw (miter and table saw);
  • pencil
  • safety glasses/goggles
  • knee pads
  • flooring installation kit (with pull bar and spacers)
  • hammer
  • tapping bar
  • tape measure
  • moisture barrier/vapor layer (especially for concrete subfloors)
  • adhesive (depends on laminate flooring brand)
  • underpads (depends on the brand as some have pre-attached ones)
  • accessories (moldings, trims, stair noses)
  • laminate flooring boards (with 5-10% allowance for waste, replacement or repairs in the future)

The next step is also critical. No matter what brand, with or without installation experience, one should always, always read the manufacturer’s installation instructions.

The succeeding steps are general processes observed and might slightly vary depending on the type of laminate flooring you are using and the specific set of instructions provided by the manufacturer.

Preparation

Site preparation. First remove the old flooring and thoroughly clean the surface to get rid of unnecessary debris, dirt and all other residue from the previous flooring product.

Carefully examine the area and check for needed repairs. Make sure that the subfloor’s surface is leveled by using a standard straight edge laser. Should there be uneven surfaces then simply apply thinset mortar to fill it. Its available in most hardware stores.

Don’t forget to measure the resulting flooring and make the necessary adjustments with your doors, trimmings, stairs and other transitions.

Consider also the subfloor material. For wood surfaces, as long as the subfloor is in good condition and shows no sign of damage – like decay or cupping, then you can go right ahead and put the laminate flooring in. The case is different with concrete though.

Moisture or vapor barriers are necessary for concrete subfloors to prevent moisture from seeping in from beneath which might cause damage to the flooring.

Also check the laminate flooring. Some products already have pre-attached underpads while others might require you to lay a separate sheet. Underpads provide a noise reduction for laminate flooring.

If you’re doing a major home makeover then ensure that all other jobs like carpentry and painting are all done before installing the laminate flooring to make sure that the surface are protected from unwanted scratches and stains. What’s the point of having a new floor when it’ll be less than perfect even before you get the chance to enjoy it?

Product Preparation. This is rather pretty simple. First make sure to examine each board or plank for any damage that might affect installation. Also scrutinize tongues and grooves to make sure they are whole and free from chips that could make locking them together hard or would leave seams visible or else gaps.

After checking, carefully arrange the laminate flooring on the room where it’ll be installed to allow it to acclimate. Acclimation simply means letting the product adapt to the temperature in the room thereby letting it expand or contract naturally for at least 72 hours.

There you have it, the initial steps in preparing for a DIY laminate flooring installation. Watch out for part 2 for the step by step process and more tips.

DIY Laminate Flooring Installation

In our previous post, we showed the basics of preparing for laminate flooring installation, today we’ll continue with the rest of the process.

Laying the first plank.

For best appearance, it is generally advised to place laminate flooring boards parallel to the longest wall.

Remember to place your spacers to allow for the contraction or expansion of your new flooring. Spacers should be placed in intervals of 12 inches.

Also make sure that the groove-side is the one facing the wall and tongue on the opposite.

If its hard to tell which the longest wall is, as the room seems a squared one, then begin at the left wall going to the right.

Make sure that the first line is a straight line so that it’ll follow all throughout.

For stability, maintain a minimum length of no less than 8 inches. Also consider the length of each plank or board when laying down your flooring.

Laying the rest of the flooring.

Be sure to secure each piece of laminate flooring laid down by connecting all the grooves and tongues properly. To do this, position each board at an angle of 30-40 degrees.

Use tapping or pull bars when hammering is needed in order to prevent damage to tongues and  grooves.

Measure and re-measure each board or plank to get the correct length before cutting your laminate flooring piece.

Also, you may have to cut the width of the last piece to make sure it’ll fit perfectly in the room.

Transitions, Doors and Stairs

As we’ve already measured the new floors resulting thickness and taken note of other accessories needed, then this should be easy.

Baseboards, door jambs and panels should be trimmed in order to fit laminate flooring planks. You can do this with power tools such as a miter saw or a simple hand saw. Just simply measure the thickness of the laminate plank to get how much to trim from the door jambs or panels.

Since we left spacers between our laminate flooring pieces and the wall there will obviously be a visible gap so we would need to install baseboards.

Also known as wall trims or baseboard trims, they conveniently hide the gaps as well as provide additional decorative highlight to the room.

To accommodate the floorings contraction or expansion upward, be sure to nail the trims to the wall and not to the floor.

When transitioning from one room to another, then be sure you have the appropriate transition piece and cut it accordingly. There are several transition pieces depending on the purpose.

Shoe molding, T-molding and reducers are often used to transition from one flooring material to another or from one room to a different one.

If the laminate flooring is basically the same level with the next flooring its transitioning into, shoe molding is normally used.

When the floor we’ll be transitioning too is lower than our new laminate flooring, then the best piece to use is a reducer.

What about transitioning to stairs? Well, you can use stair noses that’ll go along with the color of your new floor, these are commonly available too.

One thing to consider about buying stair noses is that they are a bit expensive to take measurements before placing your orders and of course, keep in mind to add a little extra for waste and future repairs.

There you go, we hope you have fun doing your own DIY laminate flooring installation project!

DIY Hardwood Flooring Installation Wood Subfloor Preparation

Moving on with our DIY hardwood flooring installation project the next important step is to prepare the site for installation. While the key element is keeping surfaces clean and free from dust and debris, preparation in general will depend solely on the type of subfloor where hardwood flooring planks will be installed.


Generally, we’ll be making preparations for nailed-down installation. Also, to make the project suitable for DIY enthusiasts, it’s best to choose prefinished hardwood flooring material so that there would be no need to coat up your brand new flooring after installation.

For maximum performance and longevity of any type of flooring, it’s very important to secure the stability of the subfloor and proper preparation. This begins with identifying the type of subfloor the property has and clearing and cleaning it up. However a quick reminder before you jump right in, be sure to read the manufacturer’s instruction for your new hardwood flooring product so that you’ll be aware if there are special instructions in preparing the subfloor, recommended underlays or vapor barrier, humidity and moisture limits.

As a universal guideline, be sure to meet these 4 criteria before installing hardwood flooring whether it’s over concrete, wood or vinyl subfloors: the subfloor must be clean, leveled, dry and sturdy.

Wooden Subfloors

Basic tools in preparing wooden subfloors are:

  • sander
  • long level bar
  • tape measure
  • shop vac
  • levelling compound
  • circular saw
  • drill and drill bits
  • screws
  • hammer and pry bar
  • pencil
  • moisture test kit or moisture meter
  • vapor barrier
  • utility knife
  • chalk line
  • safety glasses
  • work gloves
  • dust mask
  • knee pads

The tools list is not a complete list as the same may vary depending on the manufacturer’s instructions.

The basic steps in preparing wooden subfloors for hardwood flooring installation are:

  1. First, remove old flooring material and baseboards carefully if you intend to use the materials again.

  1. Check doorways and door jambs or casing for clearance. If the height of the flooring won’t fit underneath, cut the resulting height of the flooring plus the expansion gap, usually 1/16 of an inch. The resulting height simply refers to the hardwood flooring board or plank with the underlay and vapor barrier, whichever the manufacturer requires. Mark the height on the door jambs or casing with a pencil and cut out the same using a miter saw or a hand saw. If the resulting floor will not fit underneath the door, remove the door and cut of ⅛ inches for it with a circular saw.

  1. If you’re planning a glue-down installation, be sure to sand the subfloor to remove debris from wax, old flooring glue residue or any type of coating that might affect traction. The same will also level down the subfloor’s surface. Otherwise, if the new flooring will be nailed down, then its okay to leave wax or coat on top of the subfloor as long as its sanded to be evened out.

  1. Use the long level bar and measuring tape to check if the floor is even. Sand out elevation and humps and apply levelling compound to low spots following manufacturer’s instructions and recommendations.

  1. Determine moisturization rate on the subfloor using a moisture test kit to identify if the subfloor is within the recommended limits for the product. If its not within the allowed or recommended range, be sure to consult with flooring professionals.

  1. Lay down vapor barrier and underlayment. Be sure that they overlap and secure the same with a stapler. Be sure to check with the manufacturer’s instructions as some products already have pre-attached underpads.

  1. Be sure that the subfloor is sturdy enough to support the hardwood flooring to be installed. Replace damaged boards and be sure to secure squeaky boards to the floor joists.

  1. The new flooring should be laid perpendicular to the floor joists. Should you choose to have it installed in the opposite direction, be sure to reinforce the subfloor.
  1. To make sure that our installation will remain straight, we better draw guidelines by marking the center of each wall and drawing a line across. Then from that line measure another line leaving behind the expansion gap. Next measure from that point parallel to the other end of the room to form a guideline from the starting wall.

There you have it, the wood subfloor is now ready for hardwood flooring installation.

Watch out for our next post for concrete subfloor preparation.

DIY Hardwood Flooring Installation on Wood Subfloor

Hardwood flooring, there’s nothing quite like it. Visually appealing with a distinct warmth, they add value that is not easily matched. After you’ve prepped up your wooden subfloor,  we are now ready to install hardwood flooring DIY style.

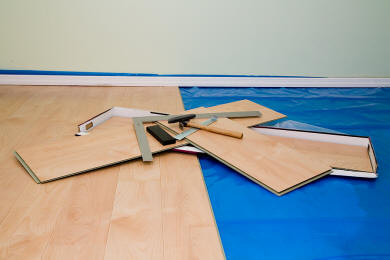
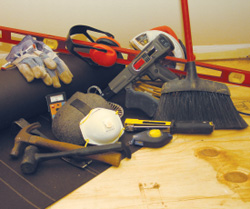
Again, don’t forget to check the manufacturer’s instructions before doing anything. Be sure to have the complete tools, some of which were mentioned earlier.

Since this is a wooden subfloor, the installation will be a nailed-down one. Follow the steps below:

  1. Lay the first row of flooring planks along the guidelines we made earlier leaving space for the expansion gap and with the tongue side facing the room. The guidelines will assure that we layout the planks straight all throughout. If the wall is not straight and will obscure our layout early on, be sure to cut the hardwood flooring planks before laying them down.

  1. Place spacers between the plank and the walls to keep the expansion gap steady. Be sure to place them no more than one foot apart for consistency.
  1. The first up to the fourth row, depending on the width of hardwood planks, will have to be face-nailed. For this process, be sure to pre-drill holes on the planks using the hardwood flooring manufacturer’s recommended bits. Be sure to drill holes every six inch along the flooring material.

   As a precaution, it would be best to wear safety glasses while you work on this project.

  1. Hammer the nails on the pre-drilled holes and finish it off using the nail set. Go back on the nail holes later and apply wood putty of the same shade as the flooring material to conceal them.

  1. Lock the groove second row of planks to the first row’s tongues. Secure the fit by hammering the planks using a tapping block to prevent damage.
  1. Stagger the hardwood flooring planks. This simply means mixing planks from different boxes and making sure that each plank’s edges does not meet and would have at least a 6-inch distance. This does not only provide a visually pleasing characteristic to the finished flooring but also stability. You can begin on the first row by cutting the first plank and be sure to keep the other half as it can be used on the other end or on a separate row.

  1. You would need to face nail rows until the pneumatic nailer can fit, this is usually on the fourth or fifth row. Be sure that the blind nailer have a protective covering underneath to protect hardwood planks from damage.

  1. Continue to stagger flooring and be sure to cut them to accommodate obstructions like vents and door casings.
  1. As you get near the opposite end of the room, you won’t be able to use the pneumatic nailer anymore, so the remaining rows of flooring would have to be face-nailed again. Follow the procedure we did earlier.
  1. For the last row, you might need to cut the plank lengthwise to make it fit. Be sure to take the correct measurements and cut it accordingly. Use a piece of wood and a pry bar to lock lock it in place before nailing. If its less than 1 inch in length, you can simply add glue to the tongue before locking it down.

  1. Remove the spacers and cut excess underlayments.
  1. Attach appropriate mouldings and transitions following manufacturer’s instructions.

  1. Then install baseboards to conceal the expansion gaps. Be sure to attach them to the wall and not the floor.

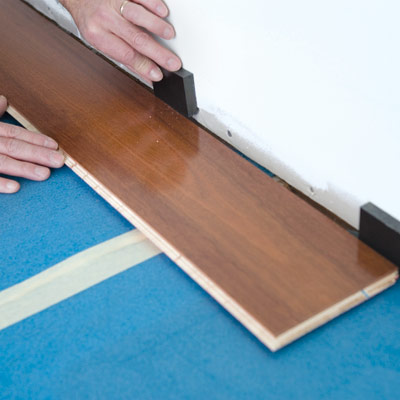
There you have it, DIY hardwood flooring on a wood subfloor. Be sure to keep excess planks for future repairs and be sure to care for hardwood flooring to enjoy its rewarding comfort for years and years ahead.

DIY Hardwood Flooring Installation on Concrete Subfloor

Hardwood flooring over concrete subfloor? Then, that was something one would hardly consider a good mix. Nowadays however, this is not only possible but has also become very popular in recent home improvement and design.

Yes, with the right preparation, cheap concrete subfloors are not just for basements anymore and it can work all throughout the house.

There are several ways to install hardwood flooring planks on a concrete subfloor but the key objective is to make sure that the subfloor is even, dry and the hardwood flooring is protected from moisture that can cause unwanted warping and damage. This will obviously require some significant amount of experience and skill as well as tools that will vary depending on the type of installation you’ll choose or which is recommended for the particular hardwood flooring you bought. Be perfectly honest if this is beyond your DIY prowess, then better leave it to professional hands.

Again, prior to making any move, its best to check the manufacturer’s instructions first. Also consider the subfloor’s condition. If its a new slab, be sure to observe the appropriate drying or curing period required.

Joists. Face nailing flooring planks to the joists is perhaps one of the oldest ways of installing hardwood flooring. The joists ensure that the flooring material is not directly touching the surface of the concrete subfloor.

Before installing the flooring planks, be sure to that the joists are in good condition and structurally sound as it will support the weight of the hardwood flooring and everything above it.

Sleepers. Another older method is something that looks like the joist installation. The illustration below best describes the process. Sleepers or 2’x4’ pressure treated slats are attached to the water-membrane protected concrete subfloor which is covered with a ¾” treated plywood where the hardwood planks would be installed. The main difference is that instead of nailing hardwood flooring planks directly over the wooden joists, they would be attached to the plywood instead allowing the woods some breathing space.

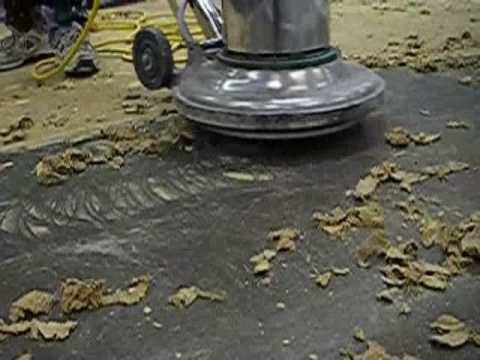
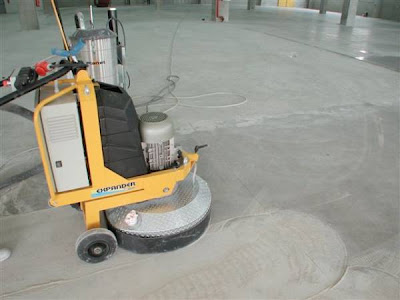
Treated Plywood. Over the last 30 years, using treated plywood has been a popular way to install hardwood flooring over concrete slab sub flooring. No, we don’t directly put the ¾” treated plywood over the bare concrete subfloor of course. We need to lay down underlayments first and ensure that the subfloor is free from moisture.

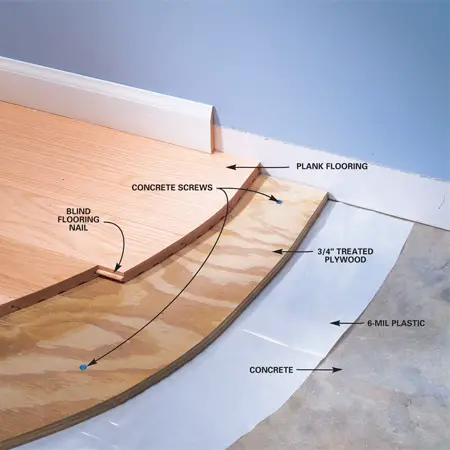
One more thing to keep in mind using the 3 methods we mentioned earlier is that they would significantly raise the height of the resulting floor. So if you are renovating a room or this is an entirely new project, you might want to check the doorways and furniture.

Glued. Here, manufacturer’s recommended adhesive is applied on the underlayment along the longest wall where the first plank will be laid down. Place the first row of hardwood flooring planks, firmly pressing each one as you go.

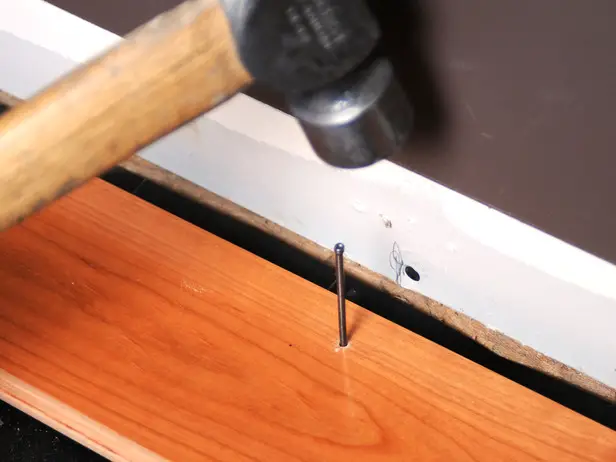
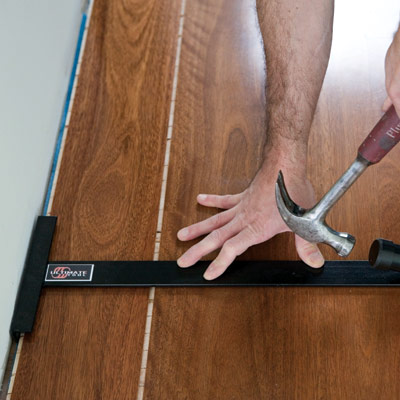
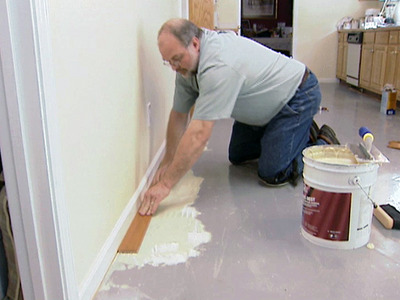
Continue doing so and be sure to stagger each flooring plank choosing hardwood flooring products from different boxes for a unique pattern. Apply builder’s tape on the planks so that they will be pulled tight and dry well. Doing this would also prevent them from slipping or being misplaced. Remember to allot space for the expansion gap.

Floating Floors. To demystify, floating floors are called as such for the simple reason that the hardwood flooring installed is not directly attached to the subfloor. Recent advances in manufacturing flooring boards and planks have given way to precision cutting, more accurately that the latest generation of hardwood, both engineered and solid and other wood-based flooring products like cork, bamboo and laminate have pristine click-lock technology enabling glueless locking.

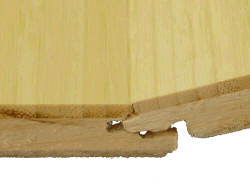
In the earlier days, of course glue was applied not to the subfloor but to the tongue and groove to secure each plank. These days though, that is seen less and less.

No matter what type of installation you plan to have on your concrete subfloor, be sure to follow the basics like:

  • Ensuring that the subfloor is dry with the recommended water/moisture barrier or sound proofing underlayment in place.
  • Make allowance for the recommended expansion gap and lay the first row straight so that the rest of the rows will go smoothly.
  • Stagger the flooring planks, allowing at least a 6 inch distance on each plank’s end to strengthen installation.
  • Consider the height of the resulting floor to accommodate doorways and door casings as well as furnishings and vents.
  • Weather nailed or glued down, follow recommended adhesives or distance between the nails.
  • Attach transitions or mouldings as directed and keep in mind that baseboards should be attached to the walls and not the floor.

To maintain the beauty of your hardwood flooring, be sure to clean it regularly and make sure repairs are done correctly.

DIY Hardwood Flooring Installation Concrete Subfloor Preparation

In preparing your concrete subfloor for DIY hardwood flooring installation, keep in mind the same categories in preparing wood subfloors still apply. Before installing hardwood flooring planks, be sure that the concrete subfloor is: clean, dry, leveled and structurally sound.

Again, it wouldn’t hurt to read manufacturer’s instructions for the flooring product before you begin preparation so that you’ll know immediately if there are specific requirements you need to achieve or comply with. At the same time, also check the local building codes in your area to avoid inconvenience.

Below is a list of common tools and equipment used in preparing concrete subfloors for hardwood flooring installation:

  • hammer and pry bar
  • concrete grinder
  • long level and tape measure
  • levelling compound and bucket
  • back saw or circular saw
  • moisture test kit for concrete
  • vapor barrier
  • pencil
  • chalk line and chalk
  • safety glasses
  • dust mask
  • hand gloves
  • knee pads

Follow these steps to prepare concrete subfloor for DIY hardwood flooring installation:

  1. Using the hammer and pry bar, remove baseboards to accommodate expansion gaps for the new flooring.

  1. Remove old floor covering. Should you have plans to re-use the old flooring, carefully remove it to avoid damage.

  1. After the old flooring has been removed also discard any old sheets or barriers and get rid of adhesive residue, dust, wax or any other debris on top of the concrete subfloor. Remember the subfloor must be clean.

  1. Check clearance on door casings, door jambs and doorways. Get the resulting height by placing a hardwood plank on top of the underlayment and adding 1/16th of an inch as allowance for expansion.  If the new flooring will not fit underneath the door, take down the door and cut off about ⅛ inches off it.

  1. Using the long level and tape measure, check if the subfloor is even.

  1. If the floor is not leveled, use the leveling compound and trowel to fill the low spots and the grinder to even out humps on the concrete subfloor.

  1. If you’re planning a glue-down application for the flooring, make sure that the concrete’s surface is free from glue, oil, sealant or other debris. If you’re worried that too much grinding would make the floor uneven, the rule of thumb is that the variance should not be more than 3/16 of an inch within a span of 10 feet.

  1. Also check to amount of moisture on the subfloor to see if it is within the manufacturer’s recommended levels. If its off, get professional advice.
  1. Always put a vapor barrier on concrete subfloors especially if you’re planning to install wood-based flooring products. Also check manufacturer’s instructions if an underlayment is necessary. Underlays add more stability and sound absorption, however some hardwood flooring planks already have pre-attached underpads.

  1. Lastly to ensure that the planks will be laid down straight, draw guidelines by locating the center of the room and drawing an intersecting line there using the chalk line. Then draw parallel lines along from the center toward the wall and marking the point where the expansion gap begins and then drawing a line on the sides.

That should get us ready to install your hardwood flooring on a concrete subfloor.