The Best Flooring For a Sunroom

A sunroom creates a transitional space between your home and yard. These spaces are often breezy and light-filled, giving you a view of the outdoors while protecting you, your furniture and your flooring from the elements.

Top Needs of Sunroom Flooring

You want your sunroom to feel as inviting and cozy as your living room. However, you can’t always use the same flooring in a sunroom as you would in a traditional indoor living space. Consider the following factors when choosing flooring for a sunroom:

Durability

Your sunroom is exposed to harsher elements than the other rooms in your home. If the space isn’t air conditioned, it’s probably more humid than your living room. Even if it is climate-controlled, a sunroom is often exposed to intense sunlight.

Your flooring needs to withstand the heat and resist damage from UV rays. It must also accommodate extreme temperature changes. Some of the less rugged materials can crack or buckle if the weather shifts rapidly.

Color

The abundant sunroom flooring options make it easy for you to select a color that complements your style. You don’t have to match it with the rest of your home.

Many people choose neutral colors for their sunroom flooring to highlight the natural feel of the room. Lighter colors are often preferable to dark ones because they reflect sunlight. Dark hues absorb light and can feel hot to the touch. This might be a benefit in the winter, but it can render the room unusable in the summer.

Moisture Barrier

Especially if it’s in a screened-in porch or high-humidity area, flooring must be moisture-resistant so that it doesn’t rot, warp or develop mold. Therefore, you should choose a material that naturally repels moisture.

You’ll also need to create an adequate moisture barrier below the floor. Placing organic materials, such as hardwood, against a concrete slab invite moisture problems. If your sunroom is raised, have a vapor barrier installed in the crawlspace below it.

Hardwood Flooring for Sunrooms

Hardwood is a popular choice for indoor floors. Many homeowners extend it to the sunroom to provide a cohesive look throughout the home. Many types of hardwoods are ideal for transitional spaces.

White oak is one of the best hardwoods for sunrooms. This dense wood resists moisture and scratching. You can extend its weatherproof properties by using an adequate sealant.
Avoid using richly colored hardwoods or dark stains. These will fade in a sunlit room. Choose a light color or planks with a dappled tone to reduce the bleaching effects of UV light. Protecting the flooring with a carpet and moving the furniture regularly will help prevent sun damage.

Pros:

  • Natural, traditional look and feel
  • Doesn’t get too hot in sunlight
  • Brings a sense of warmth to the space

Cons:

  • Not the best choice if the room isn’t climate controlled
  • Feels cold in the winter
  • Not intended for floors that get rained on
  • Not ideal over a concrete slab

Can You Use Engineered Hardwood in Sunrooms?

Engineered hardwood is more water resistant, moisture tolerant and stable than natural hardwood. It stands up well to fluctuations in temperature and doesn’t absorb moisture readily. Because engineered hardwood is made of multiple layers, it has a sturdier composition. The layers are applied in different directions, providing strength and reducing the chance that the wood will warp or buckle.

The top layer is a hardwood veneer, which delivers the visual appeal and adds protection. The veneer makes the surface look like real hardwood. If the veneer isn’t thick enough, though, it can scratch or peel off easily. Thin veneer also reduces the flooring’s water-resistant qualities. Therefore, you should look for engineered hardwood with thick, high-quality veneer if you plan to use it in a sunroom.

Pros:

  • Excellent choice for installation over a concrete slab
  • Broad range of colors and styles
  • May be more affordable than hardwood

Cons:

  • Difficult to refinish if the flooring gets damaged
  • Not suitable for exposure to rain
  • Low-quality versions won’t be durable in a sunroom

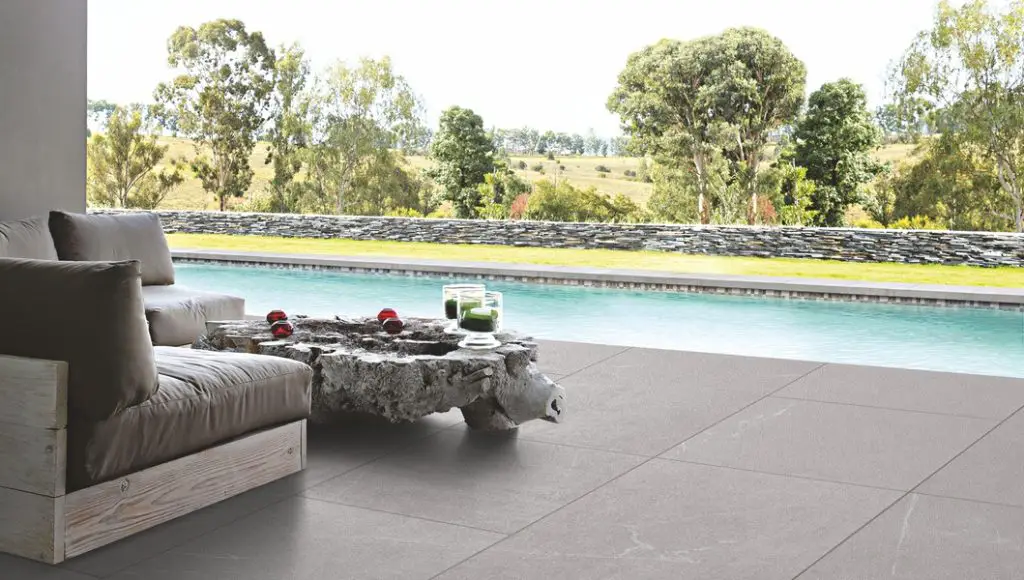
Is Tile Flooring Ideal for a Sunroom?

Tile is a common choice for sunroom flooring in warm, humid climates. Many types of tile are heat and fade resistant. This flooring is also waterproof, making it perfect for rooms that are open to the elements. You can sweep and mop tile floors easily. However, tile flooring can be difficult to vacuum. Still, it handles heavy traffic and spills.

But tile can crack when your kids run through the sunroom in their cleats or your cat drops a potted plant on the floor. Tile also makes for a hard landing if you or a toddler trip and fall. Still, you can throw a rug onto the floor to make it more comfortable and protect it from damage.

Pros:

  • Stays cool in the summer
  • Easy to clean
  • Create unique patterns and mosaics

Cons:

  • Intolerant to extreme conditions
  • Not ideal for cold climates
  • More fragile than some other options

Installing Vinyl Floors in Sunrooms

Vinyl is one of the most waterproof materials around. In fact, it’s used to make pipes and shower curtain liners. Therefore, you might want to consider it for a sunroom. It holds up well to heavy traffic, spills and falling pots. It can feel cool underfoot. However, it’s not as refreshing as tile.

Because vinyl comes in planks, it’s easy to install yourself. It can be a budget-friendly option for sunroom flooring, giving you a chance to show off your style without breaking the bank. It offers an affordable flooring option for every room, helping you maintain a cohesive look throughout your home.

However, vinyl can become brittle when it’s exposed to intense sunlight. Therefore, it might not be the best choice for a sunroom with lots of windows. Using plants, furniture and throw rugs strategically can protect this type of flooring and help it last longer.

Pros:

  • Waterproof
  • Easy to install yourself
  • Comes in unique and traditional designs
  • Slip resistant

Cons:

  • Susceptible to fading
  • Deteriorates in bright sunlight

Laminate Flooring for Sunrooms

Laminate is a combination of materials that are engineered for affordability and ease of use. Layers of high-density fiberboard are pressed together to create the planks. This material is covered with a melamine laminate that is printed to mimic any material, including hardwood and tile. The laminate is covered by a clear, protective coating, which prevents moisture from penetrating the planks and safeguards the surface from wear and tear.

Pros:

  • Springy and comfortable underfoot
  • May resist fading better than vinyl
  • Easy to clean

Cons:

  • Not the most waterproof option
  • Can’t be exposed to the elements
  • Not as tolerant of heavy foot traffic as other materials

What About Carpet in a Sunroom?

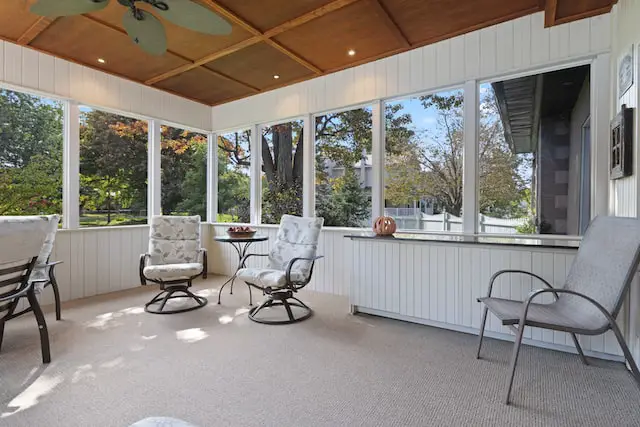
Putting carpeting in a sunroom protects the floor from foot traffic, moisture and sunlight. While carpet makes the room feel comfortable and welcoming, it isn’t always the best choice.

Carpet traps dirt particles, preventing them from entering the rest of the home. But you might have to spend extra time cleaning the rug in your sunroom. You should avoid traditional rugs and carpeting if your sunroom is humid.

However, you might opt for an indoor-outdoor carpet, which won’t absorb moisture. Carpet tiles are another great choice that you can easily reinstall if they become damaged.

Pros:

  • Comfortable underfoot
  • Protects the floor from dirt, fading and damage
  • Wide selection available
  • Reacts well to extreme temperature changes

Cons:

  • Gets dirty easily
  • Absorbs moisture
  • Increases the risk of mold and mildew growth

How to Make the Best Choice

If you can’t decide, research a few different materials. Talk to experts that can help you envision the final results. Does a particular aesthetic attract your interest? Once you select a few options, think about their benefits and disadvantages for your lifestyle. Which one fits best with your budget? The best choice will begin to make itself apparent.

Red Oak vs. White Oak Flooring

If you’re looking for hardwood flooring, you will come across a lot of oak. This type of hardwood is plentiful, durable and versatile. While oak has been used in traditional homes for centuries, it complements many styles of decor. White oak has the neutral honey tones that most people think of when it comes to this type of flooring. But red oak is another option with distinctive characteristics.

The Basics of Red and White Oak

Red and white oak trees grow abundantly throughout most of the eastern U.S. These trees develop quickly, growing more than two feet every year until they reach maturity. Each subspecies has special characteristics, adding variety and interest to the hardwood planks that are available for flooring.

Oak is a particularly hard and durable wood. It resists scratching and stands up to heavy traffic. It also has moisture-resistant properties, which help it last long indoors and outside. Red and white oak both showcase the beneficial characteristics of this hardwood. However, they have some distinct differences when it comes to appearance, durability and price.

Color

White oak has tones that fall into the brown colorway. While it can have a rich, warm, appearance, its shades favor the yellow family. White oak is often preferable in rooms that have other cool tones, such as grays and blues.

Red oak is not as dark as white oak. It also has honey and brown tones, but those are pervaded by a rosy hue.

Both types of hardwood flooring take stain well. Therefore, you can adjust the color depending on your preferences and decor. If you’re using a light or cool-toned stain, you will likely have better results by applying it to white oak. However, medium and dark stains make white and red oak look almost identical.

Because white oak is lighter in color, its patterns don’t stand out as much as they do in red oak. Therefore, red oak flooring may look livelier and attracts more attention than white oak.

Grain Patterns

Regardless of the type of wood that you use, you can vary the appearance by choosing one of the following cut styles. These influence the grain pattern along the surface of the plank:

  • Rift sawn – The plank is cut diagonally across the rings, creating a uniform pattern of mottled striping along the surface.
  • Quarter sawn – The plank is cut perpendicular to the growth rings, creating long, straight grain patterns that span the length of the board and flecks that interrupt the striped graining.
  • Flat sawn – The rings lie parallel to the face of the board, creating wavy grain patterns.
  • Live sawn – The log is cut through the heartwood, preserving the full strength of the wood and showcasing organic, undulating graining.

Red and white oak have different tendencies when they’re cut using specific methods. Quarter-sawn white oak planks often deliver the most consistent look. However, whereas the markings on quarter-sawn white oak are subtle, they stand out more in red oak. In fact, red oak generally showcases variations in the wood more dramatically than white oak.

Durability

Both types of oak hardwood have tight rings and a strong structure. They have stood the test of time as construction materials for home. But white oak is slightly more durable than red oak. According to the Janka scale, which identifies the hardness of lumber, white oak has a rating of 1360, and red oak has a rating of 1290.

Because it’s harder, white oak resists scratches, scuffs, gouges and dents. It is also more appropriate for outdoor use, such as on a deck or patio. However, the intricate and obvious grain patterns in red oak disguise scratches well. Red and white oak are both popular choices for indoor flooring, stair treads and handrails.

Again, the cut style influences the durability of the wood. Narrower, rift or quarter-sawn planks are the least susceptible to cracking and breaking. Wider pieces with variable grain patterns respond inconsistently to force. Rift-sawn wood also resists twisting and warping more than planks that have wavy grain markings.

Moisture Resistance

Oak is a porous, organic material that’s more prone to moisture damage than inorganic materials, such as vinyl flooring. Water damage from a flood or burst pipe could cause it to swell and buckle. However, if the hardwood isn’t sitting under a puddle, it can resist moisture relatively well. Because it’s so hard, it doesn’t soak up water quickly. Therefore, you can protect it by wiping up spills quickly and keeping wet towels off of the floor.

But if you’re particularly concerned about moisture, you might prefer white oak to red oak. White oak contains tylose, a plant material that obstructs the open channels within the wood and makes it less porous. This property makes it ideal for making barrels and boats as well as indoor and outdoor flooring. Because red oak doesn’t contain tylose, it’s more absorbent.

The cut style also influences the wood’s water resistance. Flat-sawn pieces are more susceptible to the effects of moisture than quarter-sawn planks. Live-sawn boards tend to be wide and have an inconsistent grain pattern, which absorbs moisture more in some places than others.

Floorboards shift as they absorb moisture. Therefore, they can warp, bend, lift and crack. It’s often best to use boards with consistent grain markings to prevent uneven deterioration. Sealing the wood properly also protects it against water damage.

Cost

White oak and red oak flooring tend to be comparable in cost. However, white oak may be slightly more expensive because these trees take longer to grow to a harvestable size than red oak trees.

The grade of the flooring has a lot to do with the price. Experts use the following rating system to identify the grade of the wood:

  • Select – The most expensive grade of oak hardwood, it has few imperfections. This grade offers the most consistent grain pattern, with only small knots permitted.
  • #1 common – This grade features more variation among the color and grain pattern.
  • #2 common – This wood is more rustic and less expensive than the other grades. It features dramatic variations, knots, wormholes and shorter planks. Sometimes, this is called cabin grade flooring.

Research the availability and cost of different types of flooring with various manufacturers. The prices fluctuate, and some manufacturers may have styles that aren’t available from other companies.

Matching Your Red or White Oak Flooring

If you’re repairing a section of your flooring or want to match the hardwood to the rest of the home, it helps to identify whether you have red or white oak flooring. If you can get your hands on a plank that shows the cross-section, look at the end of the wood. Seeing plenty of open vessels indicates that it’s probably red oak. Coating the wood with a clear sealer also brings out the undertones. Boards with a salmon glow are red oak, and pieces with a tan hue are likely white oak.

Although they have similar characteristics, the different types of wood won’t match when they’re installed next to each other. However, you can blend the different types of flooring using a medium or dark stain.

If you’re trying to pair your hardwood flooring with other elements, such as cabinets and countertops, consider complementing the tones instead of matching them exactly. In most cases, you can combine red oak cabinets with white oak flooring and vice versa. The neutral undertones of white oak make it appropriate for almost every situation.

Travertine vs. Porcelain Flooring

Tile flooring is popular for its ability to keep your home cool, easy upkeep, durability and timeless style. But with so many types of tile available, you might wonder which is the best option for your space. Travertine and porcelain are popular high-end choices. Learning more about their characteristics and benefits can help you make the best selection.

What is Travertine Flooring?

Travertine is a natural limestone that develops around mineral-rich springs. As the minerals from the springs interact with the limestone, they create unique swirls and patterns in the stone.

This is one of the most ancient building materials. Its durability and attractiveness made it an exceptional material for building many famous structures, such as the Trevi Fountain and Getty Center. Although travertine tiles are processed to deliver a relatively consistent look and feel, they retain the original peculiarities of the stone.

The following classifications of travertine offer distinct looks:

  • Brushed – The surface of the stone is textured with a wire brush to remove traces of shine and deliver a matte finish.
  • Honed – Grinding the top surface of the stone gives it a subtle sheen.
  • Polished – The surface of the travertine is smooth and glossy, giving it a marble-like, reflective appearance.
  • Tumbled – The stone is processed with abrasive particles to deliver rustic style.

Travertine tile can be filled or unfilled. Filling the indentations with grout or epoxy makes it smooth. Polished travertine is filled before it is buffed and polished. Honed travertine may be filled or unfilled. Tumbled travertine is typically unfilled, especially when it is used outdoors. Filling it adds some protection and consistency, however. Brushed travertine is usually unfilled.

The method that’s used to cut the tiles also affects their appearance and functionality. Straight-cut tiles have smooth edges that enhance a polished style. Chiseled-edge tiles have irregular borders, which provide traction and a more irregular look. Polished tiles usually have a straight edge, while brushed and tumbled tiles generally have a chiseled border.

What is Porcelain Flooring?

Porcelain tile is a type of ceramic that is made from fine, dense clay. Manufacturers produce porcelain tile by combining materials such as clay, feldspar and sand. Other materials, including quartz and silica, are often added. The wet mixture is poured into molds and flattened under high pressure. Then, it is fired at extremely high temperatures. This process removes moisture, makes the porcelain waterproof and increases the durability of the product.

You can find porcelain tiles in glazed or unglazed varieties. Glazed tiles are coated before they enter the kiln. The glaze is fused to the material under high heat and can add color, glossiness and design elements to the tile. Unglazed porcelain may have more texture than glazed tile. However, unglazed tiles can be polished to achieve a glossy finish.

How Do Travertine and Porcelain Tiles Compare?

Travertine and porcelain tiles have many similarities. But knowing how they differ might help you choose the best type of flooring for your home or business.

Color

Travertine and porcelain come in many different colors. Whereas travertine obtains its hue from the natural elements to which it is exposed during its development, porcelain can be colored artificially. Therefore, it has a broader range of tones and patterns.

Porcelain glaze can be applied in an intricate design, resulting in unique patterns and images that create lovely mosaics. Porcelain tile may also be colored before it is pressed and fired, resulting in a consistent tone throughout the material. Digital printing creates porcelain tiles that mimic other materials, like vintage wood or travertine.

Although sealing travertine can bring out the depth of its natural hues, it doesn’t change the color dramatically. Travertine usually comes in warm, neutral tones, such as cream, rust, tan, gold and gray.

Durability

Travertine is a rugged stone that stands up to heavy traffic without cracking or chipping. However, its porous surface should be sealed to prevent damage and corrosion from acids, the elements and moisture.

Outdoor travertine flooring doesn’t necessarily need to be sealed. But coating it with a sealant will protect it from sun and rain damage, reduce staining and prohibit mold, algae and mildew growth.

Porcelain is the hardest type of ceramic. To be classified as such, porcelain must have a moisture absorption rate of less than 0.5%. Therefore, it is inherently water and stain resistant.

Both types of tile are ideal for busy areas and pet traffic. Even though travertine and porcelain are incredibly durable, they can get scratched. Don’t drag furniture across them or scrub them with abrasive materials. After installation, you might want to add a rug as a layer of protection in heavily trafficked areas

Versatility

Travertine and porcelain tiles have a wide range of uses. Because they’re so durable, they are often used for indoor and outdoor flooring as well as backsplashes and fireplace surrounds. However, porcelain is less commonly found outdoors than travertine.

Porcelain is more compatible with moisture than some types of travertine. Therefore, you’re more likely to find it in a bathroom or kitchen. Porcelain is commonly used in showers and on countertops. Using porcelain slabs instead of tiles eliminates the grout, which can absorb moisture and stains.

Travertine can be used in bathrooms if it has a proper finish and sealant. It may not be as slippery as porcelain when it’s exposed to water. But you should not use unsealed travertine for indoor flooring in moisture-rich areas. It can be difficult to clean and may increase the risk of mildew growth inside your home.

Comfort

Tile flooring is much more rigid than wood, carpet or vinyl. If you drop a glass on porcelain or travertine tiles, it will probably shatter. But travertine is Travertine tiles aren’t as susceptible to temperature changes as porcelain. The fact that travertine doesn’t get uncomfortably hot in the sun makes it an excellent choice for outdoor areas and porches.

Although porcelain remains stable in extreme temperatures, it reflects the heat and coolness of the environment. Therefore, it may feel colder than travertine in the winter and warmer underfoot in the summer.

porcelain tile flooring outside

Cleaning

Both types of tile are relatively easy to clean. You can wipe spills from porcelain and sealed or polished travertine easily. Remove acidic materials, such as juice, coffee and wine, as soon as possible. However, you should be cautious with the products that you use to deep clean both types of tiles.

Use mild soap or a product that’s designed for natural stone to clean travertine. Avoid using cleaners with bleach, ammonia, citrus or vinegar, as these can etch the surface of the tile. Don’t use generic cleaners on travertine either.

You can use a diluted vinegar-and-water solution to give porcelain a deep cleaning and sanitize the surface. For everyday cleaning, hot water, mild soap or multipurpose cleaners that are safe for porcelain will work well. However, avoid leaving puddles, and use fresh water to rinse the surface and remove residue from the cleaning agent. You should avoid using waxes, oil-based cleaners, ammonia and bleach on porcelain tile.

No matter what type of cleaner you use for your tile, sweep up loose debris before mopping or wiping your floors. If you don’t, you risk scratching the surface with particles of sand and dirt. Regular sweeping and mopping extends the longevity of the tile, preventing residue from building up.

Maintenance

Porcelain tiles require little maintenance compared to travertine. Depending on the amount of traffic that it’s exposed to, travertine must be sealed every three years or so. You can tell when it’s necessary to seal travertine because it starts to look patchy and absorbs stains easily.

You don’t have to do much more than clean porcelain to maintain it. Most porcelain tiles don’t require a sealer. Some homeowners choose to seal the porcelain to protect the appearance of the grout, however.

You may have to perform more complicated repairs on porcelain than travertine, though. You can often fix cracked travertine epoxy. But repairing damaged porcelain tiles usually requires you to remove them and install new ones.

Recycling Your Hardwood Floors (How, Where, and Why)

It’s exciting to plan a flooring project. Deciding on the style, color and material keeps you busy and allows you to customize your home’s environment. But you might spend so much time envisioning the new floor that you don’t stop to consider what happens to the waste from the old flooring. If you’re replacing hardwood floors, you can reduce your impact on the environment by recycling them.

Benefits of Recycling Hardwood Flooring

Most people are familiar with recycling glass, metal and paper. However, you may not realize that you can also recycle your hardwood flooring.

Reduce Deforestation

The primary benefit of recycling hardwood is that it prevents trees from being cut down to make wooden products. Many hardwood planks are restored and sold as reclaimed pieces to lumber yards and flooring manufacturers.

Prevent Waste From Ending Up in Landfills

Recycling old hardwood floors also reduces the amount of waste that ends up in landfills. Although landfills are necessary for containing solid waste and preventing it from ending up in other areas, they have detrimental impacts on communities and the environment.

Wood makes up slightly more than 8% of the solid waste in landfills. With some states running out of landfill space, it’s more important than ever to repurpose or recycle garbage, including hardwood flooring.

Landfills also produce greenhouse gases, which contribute to climate change and pollution. Natural habitats are decimated to make room for landfills. Garbage dumps further damage ecosystems by leaching chemicals and toxins into the ground.

Moreover, landfills can be smelly and noisy. They reduce the value of adjacent land and create health risks for nearby residents.

Produce New Materials

Whether you send your old hardwood floors to a recycling center or repurpose them creatively, you support the creation of new materials. This practice protects natural resources and reduces the amount of energy that is spent on production of new materials.

It also reduces costs. Disposal fees for recycling facilities are often lower than those for landfills. DIY recycling saves you money on these fees and prevents you from having to buy new materials for projects. Manufacturing products from recycled materials also tends to cost less than making items from new raw materials.

How to Recycle Hardwood Floors

Part of the process of renovating your floors involves making decisions about how to dispose of the old materials. Coming up with a plan ahead of time can make the recycling process easier. Here are some ways to recycle hardwood floors.

1. Repurpose It Yourself

If you’re handy with woodworking tools, you can make just about anything with the planks that you pull off of the floor. Some creative ideas for things to make with reclaimed wood include:

  • Shelving
  • Furniture
  • Decorative facades for cabinetry
  • Accent walls
  • Headboards
  • Home decor
  • Artwork

Old floors often have discoloration and imperfections. However, sanding and refinishing the surface provides a clean look. You may not be able to get rid of all of the flaws. However, this aspect of repurposing hardwood gives your projects extra character.

Reclaimed hardwood is an excellent material for many home improvement projects. It is often harder and denser than wooden planks that are available at hardware stores. If it’s still in great shape after being tread on for years, it will deliver the same resilience wherever it ends up. Plus, reclaimed wood adds character to projects.

2. Contact a Recycling Facility

You can’t put old hardwood floors with your other curbside recycling items. Wood contaminates the city recycling facilities, which cannot process this material. Look for an independent recycling center that deals with other materials.

Some recycling facilities work directly with construction and demolition companies and accept large loads of wood. They may offer recycling dumpsters, which you fill up at your pace. Recycling companies that accept hardwood should even be able to haul off the material for you. You’ll typically have to pay a fee to use a recycling service.

3. Sell or Donate It

Building with reclaimed wood is a popular way to protect the environment and save money. You may be surprised by the number of people who are looking for inexpensive sources of reclaimed materials for their projects. You can try to sell the hardwood on local marketplaces, on Craigslist or at yard sales.

You might even have takers if you set the material by the curb with a sign indicating that it’s free. However, you can’t guarantee that the person who picks it up will recycle it.

If your old flooring is in great condition, or even if you bought too much, you might want to contact a local salvager or flooring contractor. In addition, you can donate it to organizations such as Habitat for Humanity.

4. Use a Removal Service

Some contractors will dismantle a hardwood floor for a fee. The benefit is that they’ll clean up after themselves and haul away the old material. If you choose this option for your hardwood floor removal, ask about what they do with the planks. Eco-friendly companies will recycle it, making it an efficient option for those who don’t want to get involved in a home improvement project.

Dos and Don’ts for Recycling Hardwood Floors

Before you make provisions for recycling your floor, ensure that it’s made of true hardwood. Engineered hardwood flooring is harder to repurpose because it may be glued down. Also, the click-and-lock mechanism on engineered hardwood planks often gets damaged as the wood is removed.

The condition of the wood makes a difference if you’re using the wood for another project. Pieces with extreme damage or rot won’t be suitable for upcycling. If the hardwood is in bad shape, the best option is usually to have it hauled off to a recycling facility.

If you are planning to reuse the wood, take care when you’re removing it. Start by removing the baseboards. Easing planks off of the substrate with a flat bar is an ideal way to get them up. Try to remove several rows at a time to avoid damaging the tongue-and-groove areas. Older wood floors have been subjected to temperature and moisture changes for years and may be susceptible to cracking. Be gentle, and follow the directions of the nails. If you use too much force, you might split the wood.

Find out how you should prepare the wood for the recycling option that you choose. You may need to sort the material, discarding planks that are in poor condition. Some facilities require you to remove nails and other fasteners from the boards.

Although creating a bonfire sounds like a fun way to dispose of your hardwood flooring, it’s not the best idea. The planks likely contain finishes and chemicals that are harmful to your health and the environment. When you burn them, you put yourself and your neighbors at risk of breathing in the toxic smoke. The chemicals in the wood also make it a poor choice for using as mulch.

Take the proper safety measures when you’re working with wood. Wear gloves to protect your hands from getting splinters. Use a mask to avoid inhaling particles when you’re sawing or sanding reclaimed wood. With the right precautions, planning and creativity, you can recycle your hardwood floors, contributing to the preservation of the planet and potentially saving yourself money in the process.

How Soon Can You Walk on Laminate Flooring After Installation?

Having laminate flooring installed is exciting. It enhances the appearance of your space and upgrades the feel of your environment. In fact, you may like your new flooring so much that you’re hesitant to walk on it. But flooring has to be as functional as it is stylish. It goes underfoot, and you probably wonder how soon you can walk on laminate after installation.

How Soon Can You Walk on Floating Laminate Floors?

Laminate is an engineered material that is made with a fiberboard core. The top layer contains a high-resolution photograph of the suggested surface, making the laminate look like wood, stone, tile or another flooring material. The pieces are coated with a clear layer that protects them from scratches, stains and fading.

Most laminate flooring comes in the form of click-and-lock planks. Each segment has a tongue-and-groove mechanism that connects it to the next piece. You assemble the floor as an interconnected mat. When you cut and shape it to your room dimensions, it fits in place perfectly. A floating floor doesn’t need to be nailed or glued to the subfloor.

Some people confuse laminate with vinyl or engineered hardwood. Both of those materials are available as floating floors.

Vinyl and laminate are quite similar. Both are made of various layers of compressed material. They are usually created to look like wood or another luxury flooring type. Like laminate, vinyl is available as a floating floor.

Engineered hardwood also features tongue-in-groove planks and installs as a floating floor. However, it feels different than vinyl and laminate. With engineered hardwood, real wood veneer is sandwiched on top of a layer of plywood. Because it’s real wood, its grain pattern is more realistic than that of vinyl and laminate. It is also more durable.

Does the Floating Floor Require Adhesive?

Whether you install true laminate or another type of floating floor, it’s safest to avoid walking on it for about 24 hours. Some experts say that you can walk on it immediately because you don’t have to worry about disturbing the adhesive curing process. But it’s a good idea to let gravity work on the planks, allowing them to settle evenly onto the subfloor before putting weight on them.

While floating floors are not affixed to the subflooring, they may require adhesive to secure the planks together. If this is the case, you need to wait the appropriate amount of time for the glue to dry and cure. Follow the directions on the product label. When in doubt, give the floor 24 to 48 hours before exposing it to foot traffic or moving your furniture back.

How Soon Can You Walk on Glue-Down Laminate Floors?

Some types of laminate are meant to be glued down instead of installed as a floating floor. In some ways, these floors are more durable than floating floors. The material won’t shift as much under pressure, and it’s less likely to buckle from moisture damage.

But it’s important to use the right type of laminate if you plan to glue it down. Flooring material that’s not intended for this purpose may not adhere properly. It may also buckle or create gaps due to natural expansion and contraction.

Installing this type of flooring is more time-intensive than fitting a floating floor. It’s especially important to keep the humidity levels low. You should also wait about 72 hours after washing the subfloor before gluing down laminate segments.

After you have completed the installation process, you’ll need to wait for the glue to dry and cure. This time frame may be different for distinct types of adhesives. However, it’s usually about 24 hours.

If you walk on a glue-down laminate floor before the adhesive has cured, you risk shifting the planks from their perfect position. Moreover, the planks may not adhere properly. The best way to install glue-down flooring is to go over it with a weighted roller after the application. This ensures that the segments bond evenly with the subfloor and reduces the risk of buckling and bubbles.

You should also follow the 24-hour guidelines when installing glue-down vinyl floors. They behave similarly as laminate and need time to cure before accommodating foot traffic.

How Soon Can You Put Furniture on Laminate Floors?

After you install laminate floors, you are probably eager to see how it looks in the context of the environment. You can’t get the full impact until you place your furniture where it belongs. Many homeowners wonder how soon they can put furniture on laminate floors after installation.

You should wait about 24 hours before replacing your furniture. This will give the flooring time to settle and acclimate. However, some experts say that you can move your furniture back right away.

When you move your furniture onto your new floor, protect the material from damage. Enlist help to lift heavy items so that you don’t drag them across the floor. You might want to place cardboard under your feet to prevent scratches and scuffs. Consider affixing felt pads to the undersides of your furniture to avoid damage to your flooring in the future.

But if your glue-down floors are vinyl, don’t use furniture pads that contain rubber. The chemical reaction between rubber and vinyl generates permanent yellow stains.

How to Avoid Walking on Your Floors During Installation

We have all seen the cartoons in which the characters paint themselves into a corner. You may feel like the same thing will happen to you when you’re installing laminate flooring. To avoid walking on the surface while you’re installing it, follow the steps below:

  • Start at the corner or edge farthest from the door.
  • Work your way toward the exit door.
  • Leave an unfinished path to walk along until installation is complete.
  • Wear socks, and tread lightly if you must walk on the surface.
  • Consider spreading out your weight by laying a wooden board on the floor before stepping.

Protecting Laminate Flooring From Future Damage

Your new laminate floors may look so good that you hesitate to walk on them. But you want to feel comfortable in your home and live your life without worrying about ruining your floors.

Fortunately, laminate is incredibly durable. Regular foot traffic shouldn’t impair its function or appearance.

Still, you can protect the longevity of your laminate flooring by:

  • Taking off your shoes inside the house
  • Placing mats at entryway doors to collect pebbles and dirt, which can scratch the floor
  • Putting felt pads underneath furniture
  • Replacing the felt pads before they have a chance to wear out
  • Using plastic flooring pads under furniture with casters
  • Placing rugs in high-traffic areas
  • Checking with the laminate manufacturer to determine the best type of rug pad to use
  • Keeping the indoor temperature and humidity consistent

Following the guidelines above will keep any type of flooring looking its best for as long as possible. Laminate flooring should last 15 to 25 years before needing to be replaced. However, walking on it too soon and failing to protect it will shorten its life span.

Can I Use Pine Sol on Vinyl Floors?

Pine-Sol has been making multi-surface, budget-friendly cleaning solution since 1929. You might have this disinfectant and deodorizer under your sink. Because Pine-Sol kills 99.9% of germs, it seems like the perfect cleanser for the kitchen and bathroom. But if you have vinyl floors, you might wonder if you can use Pine-Sol.

Yes, You Can Use Pine-Sol on Vinyl Flooring

Vinyl flooring is distinguished by its toughness and convenience. Since it’s non-porous, it doesn’t soak up moisture or spills. This makes it perfectly fine to use Pine-Sol on. These properties make vinyl floors ideal for high-traffic and messy areas. But your floor likely needs a regular deep cleaning.

If you love the smell and effectiveness of Pine-Sol, you’re in luck. According to the manufacturer’s website, Pine-Sol is safe to use on vinyl. You can also use it on other vinyl surfaces in your home, such as PVC shower liners.

The product is safe to use on the same floors that your babies and pets hang out on. However, you should keep it and all cleaning supplies away from curious hands and mouths.

Additionally, there are many other types of floor cleaners available, not just Pine-Sol. The cleaner below is a great example of this:

What Chemicals Should You Avoid Using on Vinyl Floors?

Because vinyl is so resistant to water and stains, you might figure that you can use just about any cleaning solution on it. Using Pine-Sol is a fine idea.

But you should never use the following chemicals on vinyl floors:

  • Ammonia – While this chemical cuts through grease, it can degrade vinyl flooring and cause it to crack.
  • Abrasives – Using abrasive cleaners or scouring pads will remove some of the shine from the vinyl’s finish. Over time, you can wear down the material, limiting its lifespan.
  • Wax – Floor wax is not just a natural substance that you apply to protect your floors. It contains synthetic chemicals that ruin vinyl.
  • Rubber pads – If you’re thinking about using mats with rubber backings to keep your vinyl floors clean, consider another option. Rubber reacts with vinyl, causing permanent yellow stains. Keep this mind when placing pads underneath chairs or using carts with rubber wheels on the surface.
  • Detergents – Don’t use detergents to clean vinyl floors. They can create a cloudy buildup.

What If I’m Not Sure if My Floor is Vinyl?

It’s easy to confuse vinyl, linoleum and laminate. These materials are often used in kitchens, bathrooms, laundry rooms and foyers.

But linoleum is a rare material these days. It’s being replaced with vinyl, which often mimics the look of vintage linoleum. That can make it difficult to identify the type of flooring that you have. However, you can use Pine-Sol on vinyl or linoleum.

Laminate is a different animal. It is made of wood byproducts that are covered in a protective plastic or resin layer. While laminate often looks like hardwood, it comes in other styles too. You can use Pine-Sol on laminate, but you may want to use a slightly different technique than you would on vinyl.

Still, if you can’t identify your flooring material, you don’t have to worry about ruining it with Pine-Sol. The manufacturer does recommend testing the product in an inconspicuous area before using it on the entire surface, though.

How to Clean Vinyl Floors With Pine-Sol

Depending on the location of your vinyl floors, they might be exposed to spills multiple times a day. You can spot clean food, dirt and grime using water and a paper towel or washcloth. Once every week or two, break out the Pine-Sol to clean the floor more thoroughly.

Follow the steps below to clean your vinyl floors with Pine-Sol:

1. Get rid of surface dirt.
Mopping the floor without removing dry dirt and dust can lead to damage. The abrasive grime can scratch the surface as you clean. Therefore, remove debris with a vacuum or dry mop first.

2. Mix the solution.
Put one gallon of water and one-quarter capful of Pine-Sol in a large bucket. Agitate it a bit to combine it. Don’t be tempted to overdo the cleaning product. If you use too much, your floors could end up sticky.

3. Get to mopping.
Dip the mop into the bucket of water and Pine-Sol. It’s essential that you wring it out as much as possible before applying it to the floor, though. If you use too much water, it can seep between the cracks of vinyl planks and damage the underlayment.

4. Rinse with clean water.
To prevent buildup, follow the cleansing with a clean wash. Rinse the mop and bucket with fresh water. Then, go over the floor using only water. Make sure that you don’t leave any puddles or water. Drying the floor with a soft towel will prevent moisture from seeping into cracks and reduce the risk of falls.

How to Disinfect Vinyl Floors With Pine-Sol

Pine-Sol kills or deactivates a broad range of germs. You can use it to disinfect the floor after a child gets sick or a pet makes a mess.

Begin by cleaning up the mess. Remove any solid matter, and clean up liquids. Apply undiluted Pine-Sol to a damp sponge or towel. Wipe the floor with it, leaving the solution on the surface for 10 minutes. Rinse it off with a clean mop or towel and fresh water.

Removing Scuffs and Stains from Vinyl

Scuffs and stains can instantly spoil your pristine floors. You can apply small amounts of Pine-Sol directly from the container to targeted areas. Use a toothbrush or washcloth to rub the stain until it goes away.

If that doesn’t work, mix baking soda with a small amount of water to create a paste. Gently rub the mixture onto the scuff or stain. Once the stain disappears, wash off the baking soda paste with diluted Pine-Sol.

Coconut oil can effectively get rid of scuffs and stains that aren’t resolved with the baking soda paste method. Simply rub it onto the stain with a cloth until the spot disappears. This will make your floor especially slippery, though. Using Pine-Sol will cut through the oil and restore your vinyl floor’s appearance.

You can use rubbing alcohol on vinyl flooring to remove ink, dye and makeup stains. Mineral spirits work well for crayon marks and paint spills.

Vinyl Floor Maintenance

Vinyl floors are easy to maintain. You don’t need to do much to keep them looking great.

Keep in mind that vinyl floors can become dented and scratched. To prevent this from happening, cover the feet of your furniture with vinyl pads. Place cardboard or plywood over the floor when you’re moving heavy items or furniture.

Divots in the vinyl are not only unsightly but also dirt collectors. Your floor will retain its original splendor for longer if you safeguard the surface.

Also, taking care of messes right away prevents stubborn stains from developing. Keeping a spray bottle of Pine-Sol handy can help you manage sticky or greasy messes. Wiping stains immediately helps to prevent them from becoming permanent.

Maintain the sparkle from your routine cleaning by preventing debris from accumulating on the surface. Sweeping daily and placing floor mats with vinyl-safe backings go a long way toward protecting your floors.

How to Get Waves Out of Vinyl Flooring

Vinyl flooring started to show up in the mid-1900s as a convenient, low-maintenance substitute for linoleum and cork. Today, vinyl flooring is the most popular option for people who want to combine affordability, style, durability and ease of use.

As a type of resilient flooring, vinyl is flexible and comfortable. Even when it’s installed over a concrete slab, the surface doesn’t shock your bare feet in the winter. It also provides some cushion underfoot.

But vinyl’s flexibility is its downfall as well as its benefit. Vinyl can crease, ripple and wrinkle, making it difficult to install and unsightly on your floors. Learn how to get waves out of vinyl flooring before and after installation so that you can take advantage of the material’s benefits.

Do the Waves and Bumps Appear Over Time?

Sometimes, a vinyl floor that has been in place for a while begins to develop bumps, waves and creases. Small bumps and uneven areas could be caused by an uneven subfloor.

Vinyl tends to molds itself to the surrounding surface. Therefore, the vinyl can only lie as flat as the surface below it. When you initially install the flooring, it may appear to have a smooth surface. But as it settles, imperfections in the subfloor will make themselves known.

Do the Ripples Have Air Beneath Them?

Do the ripples in your vinyl floor have some give when you press on them? Bubbles may show up immediately, or they may take years to become apparent. Once they appear, they don’t go away on their own.

Air bubbles can develop for a number of reasons, including the following:

Moisture – If your subfloor is not prepared and sealed properly, it could become a magnet for moisture. Wetness weakens the adhesive that holds vinyl to the subfloor. As that happens, it releases the bond in some areas, causing bubbles beneath the surface.
Excessive Heat – Does sunlight stream in through your window onto the vinyl floor every day? Does heat from the vents in your home continually aim at a particular area? Those spots may expand more than the rest of the vinyl. If you don’t account for this issue during installation, you might end up with bubbles in the hot spots.
Lack of expansion gap – An expansion gap is a small space around the perimeter of the flooring that allows for movement. It gives the vinyl room to expand without getting crowded. If you don’t include an expansion gap in a floor that requires one, the vinyl won’t have anywhere to move but up as it expands.

How to Prevent Waves in Vinyl Flooring

Waves in vinyl flooring can be difficult to repair. The best way to keep waves out of your vinyl flooring is to prevent them from forming in the first place. Being meticulous during the installation process will save you headaches down the road.

1. Prepare the Subfloor

Prevent imperfections in the subfloor from showing up by preparing the surface correctly before installing your vinyl. A well-prepared subfloor will give you a smooth surface to start with and improve adhesion if you plan to use glue or double-sided tape.

Some of the steps that you should take include:

  • Conducting a moisture test
  • Repairing cracks, holes and grooves
  • Making sure that the subfloor is level
  • Sanding down lumps and bumps
  • Cleaning the subfloor to remove grease, dust, dirt and debris

2. Choose the Right Material for the Space

If you’re installing a vinyl floor in a high-moisture area, such as a bathroom, kitchen or basement, look for a waterproof product. You should also consult with a professional to ensure that the subfloor is prepared adequately.

Some vinyl flooring is designed to go directly over your existing floor. Floating floors are made with thicker vinyl, which is less likely to warp or settle into dips in the subfloor. They’re the best option for installing over tiles or textured surfaces.

3. Opt for High-Quality Vinyl

Today’s vinyl is different than your grandmother’s flooring. Vinyl flooring ranges from 2 to 8 millimeters in thickness. Luxury vinyl tile, or LVT, is generally thicker and sturdier than vinyl sheeting.

4. Use the Right Installation Method for Your Flooring Type

We can’t emphasize enough how important it is to install the flooring correctly. If you’re using adhesive, go over it with a weighted roller. This will ensure that the material sticks to the substrate without creating air bubbles and will prevent waves in the future.

5. Don’t Drag Heavy Furniture Across the Floor

Because vinyl is subject to subtle movements, it can wrinkle if you drag heavy objects across it. Loose lay and floating vinyl floors are especially susceptible to this type of damage.

Place plywood over the floor if you’re moving large appliances, boxes or furniture over it. Lift the objects instead of dragging them over the material.

How to Deal With Existing Vinyl Floor Ripples

You have some options for eliminating waves that crop up in your existing vinyl flooring.

  • Take the following steps to get rid of bubbles that are less than one inch in diameter:
  • Use a strong, sharp needle to pierce the center of the bubble.
  • Use your fingers to press on the bubble and release air.
  • Place a thin towel over the spot.
  • Warm an iron to a medium heat setting, and place it over the towel.
  • Flatten the bubble using heavy books for 24 hours.

If the bubble is more than one inch in diameter, take the following steps:

  • Place a towel over the bubble, and apply heat to the towel using an iron.
  • Slice the bubble with a sharp utility knife.
  • While the vinyl is still warm, peel it up carefully.
  • Apply adhesive to the underside of the vinyl.
  • Smooth the material into place, wiping away excess adhesive with a damp sponge.
  • Place wax paper over the spot before piling books on top of it.
  • Allow the adhesive to dry underneath the weights for 24 hours.

If you don’t want to puncture your flooring, you can try the following method:

  • Heat the rippled area using a hair dryer on the lowest setting.
  • Smooth the spot using a floor roller.
  • Apply a board with weights on it for 24 hours.

Vinyl planks or tiles are relatively easy to replace. If you notice warping or bubbling in this type of floor, remove single planks. Correct moisture and subfloor issues before installing a new section.

With the right installation, maintenance and care, vinyl floors last a long time. They stand up to spills and don’t develop moisture issues as readily as some other porous materials. However, they’re not invincible. Follow the tips above to prevent waves in your vinyl flooring. If you notice ripples, take action as soon as possible.

A professional can give you the best advice for fixing ripples in your floors. Even if you prefer to do projects like this yourself, you may have better luck and extend the life of your flooring by working with an expert.

Does Vinyl Flooring Expand?

It takes a meticulous person to install flooring correctly. The planning is just as important as the execution. You often have to work around a variety of shapes, such as the corners of cabinets and the rounded base of toilets. To make matters more complex, you need to take expansion into account to prevent large gaps from forming in and around your flooring.

Why Does Vinyl Flooring Expand and Contract?

There are several reasons that vinyl flooring expands and contracts.

Temperature Fluctuations

Temperature fluctuations are the primary cause of expansion in vinyl floors. Almost every building material expands when it is exposed to heat and shrinks when it is cooled. Although you may think that the temperature inside of your house remains consistent, it varies enough to affect your floors.

Vinyl expands when the sun hits it or the heat is on. It shrinks when the air conditioning is running or the slab below it cools off in the winter. This means that your vinyl floors are constantly moving in miniscule increments.

Moisture Variations

Moisture also influences the stability of vinyl floors. Too much humidity makes the material expand. Extremely dry environments cause vinyl to shrink and become brittle.

The ideal humidity level for vinyl floors is typically 35% to 55%. You can extend the life of your floors by using a humidifier or dehumidifier to regulate the amount of moisture in your space.

Foot Traffic

Although vinyl floors feel hard to the touch, they’re much softer than hardwood and ceramic tile. The tiny air pockets in the porous core allow the vinyl to shift. Any weight that you place on the floors will compress them vertically, forcing them to expand horizontally.

This movement isn’t visible to the naked eye immediately, and you can’t feel it. However, over time, you may start to notice peaking, warping and curling due to the expansion.

What Types of Vinyl Floors Have the Most Expansion Issues?

There are a few types of vinyl floors. Each one has different requirements when it comes to accommodating expansion.

The installation instructions for your flooring should indicate how much of an expansion gap to leave. This is a 0.25 to 0.5-inch space at the perimeter of the floor that gives the material room to grow. You can usually cover it with baseboard molding or seal it with caulk.

Sheet Vinyl

Sheet vinyl is some of the most affordable flooring that you can buy. This flexible material comes in rolls that are 6 to 12 feet wide and can be cut to any length. You can typically cover a bathroom with one sheet. If you are installing sheet vinyl in a larger room, you may have to use more than one piece, which means that you’ll have a seam where they touch.

This seam is especially necessary in very large rooms. It will accommodate expansion and help to maintain the impeccable appearance of your floor.

Traditional sheet vinyl requires adhesive to keep it in place. Even though the glue will prevent it from shifting and lifting, the material can expand. You should leave an expansion gap around the perimeter of traditional sheet vinyl.

Some types of sheet vinyl are designed for a loose-lay application. This material has a fiberglass backing, which makes the flooring more rigid than basic sheet vinyl. Therefore, it remains flat without curling. You should use double-sided adhesive to secure the edges of this type of flooring.

Soft vinyl sheeting generally expands and contracts more than loose-lay options. However, both are prone to swelling and require you to leave an expansion gap around the perimeter.

Tiles and Planks

Tiles and planks are thicker and harder than sheet vinyl. They come in a variety of shapes, such as squares, rectangles and hexagons. You can arrange them in many configurations, customizing their appearance for your décor.

Stick-On Vinyl Tiles and Planks

Some vinyl tiles and planks come with adhesive backings. These act like stickers. You simply peel off the paper on the back to expose the adhesive, and stick the tile to the substrate. Other tiles and planks require a separate adhesive.

While these can expand and contract, they’re less likely than sheet vinyl to buckle. In fact, they will generally only swell and shrink as much as the subfloor does.

If you leave an expansion gap around the perimeter of your room, the tiles could shift slightly over time, creating spaces between them. Cut this type of flooring to the edge of the room. If you end up experiencing buckling, you can always replace a single tile.

Floating Vinyl Floors

Floating floors come as separate pieces that connect with a click-and-lock mechanism. When you measure and install these correctly, you won’t use any adhesive.

This type of flooring is prone to some expansion. However, it’s quite resistant to temperature and humidity. Still, you’ll need to leave space around any vertical surface, such as walls and pipes, to allow for movement. Expansion seams in the center of the floors are necessary in extremely large rooms.

Loose-Lay Vinyl Planks

Loose-lay vinyl planks expand and contract less than other types of vinyl flooring. They’re designed to remain stable in response to temperature and humidity changes. The friction created between their rubbery backing and the subfloor keeps these tiles in place.

Because loose-lay planks don’t expand or contract significantly, they’re an ideal option for rooms with high humidity, such as basements and bathrooms. You don’t need to create an expansion gap around the perimeter of this type of floor.

Preventing Vinyl Swelling and Shrinkage

When the walls or baseboards constrict vinyl as it expands, it can buckle. This may create waves and uneven surfaces in the flooring. If temperature fluctuations happen regularly, the floor will be subjected to repeated expansion and contraction.

Eventually, the material may shift. Cracks might show up between the floorboards. The material can also break down faster than it would if you kept it at a more consistent temperature.

Before installing vinyl flooring, you must acclimate it your environment. Unpack in the room in which you plan to install it. The temperature of the floor in this room should be between 59 and 80 degrees Fahrenheit.

Arrange the vinyl in its expected location on the floor. However, you don’t have to be too nit-picky about it. Leave the flooring there for 48 hours so that it adjusts to the temperature and humidity of the room.

After installation, vinyl will expand and contract the most near windows and vents. Aim to avoid exposure to intense sunlight by drawing the blinds during the day. Keep your indoor temperatures as consistent as you can. In other words, don’t set the thermostat to 55 when you leave for work and raise it to 72 when you return. Finally, wipe up spills as soon as possible to prevent moisture from seeping into cracks.

With proper installation and care, vinyl flooring shouldn’t cause problematic expansion. If you’re dealing with cracks, waves and buckling on your current vinyl floor, you might need to perform some repairs. Upgrading to a new floor using advanced technology can produce desirable results that last a long time and prevent problems down the road.

What is Cabin Grade Flooring?

Hardwood floors come in many styles, grades and prices. Some hardwood flooring is clean, modern and minimalistic. But that doesn’t always complement the rustic, farmhouse style that’s so popular nowadays. Plus, hardwood flooring can get expensive. Cabin grade flooring satisfies your desire for a casual, natural look and saves you money.

Cabin Grade Flooring is Utility Grade

Like eggs, hardwood flooring is graded according to certain aesthetic characteristics:

  • Prime – AB grade flooring is uniform in color and grain pattern and has minimal knots.
  • Select – ABC grade flooring contains some knots and color variation.
  • Natural – ABCD grade flooring has plenty of variation in its pattern and color and contains significant knots.
  • Rustic – CD grade flooring offers a vintage, pastoral style and has lots of knots and grain variations.
  • Utility – Cabin grade flooring is the most rustic, with many natural imperfections.

You may read that cabin grade flooring is low in quality. However, it’s not an inferior product. It simply contains more of the deviations that occur in natural wood. Don’t confuse cabin grade flooring with factory seconds, which are usually cast offs that do have quality issues.

Cabin grade flooring is harvested from parts of the tree in which knots, cracks and scratches are likely to be found. These types of planks are not milled as meticulously as other grades. Therefore, they may not have a uniform thickness or length.

Because of the nature of cabin grade flooring, it may also contain more defects than other grades. But these are like beauty marks; they create character. Nevertheless, you may have to work around some of the flaws and generate extra waste.

Types of Imperfections Found in Cabin Grade Flooring

We think of flaws as something negative, but many people look for wood with imperfections because it has more character than uniform planks. Some of the variations that you will find in cabin grade floors include:

  • Heartwood – Strong, decay-resistant wood from the center of the tree, which often contains tannins that darken its tone
  • Sapwood – The outermost layer of wood, which is lighter than heartwood
  • Knots – Illustrative of the location where a branch meets the tree, these oval shapes contain resins that make them darker than the surrounding wood
  • Pinholes – Narrow cavities that formed when wood-boring insects lived in the tree before it was harvested
  • Filler – Material that is added to holes, particularly in knots, to close the gap
  • Splits – Cracks in the surface of the wood that add character without impairing its durability
  • Mineral coloration – Patches of color that are formed when minerals from the soil leach into the wood as the tree grows

What You Should Know About Cabin Grade Floors

Having realistic expectations can help you get the look that you’re going for with cabin grade floors. Here are some things that you should consider before making a decision.

Boards Are Shorter Than Usual

While many planks will be a standard 24 inches long, about 50% of them will be shorter than that. This can add work to the installation process. However, many installers feel as though the labor balances itself out because they don’t have to deal with bowing and warping. Also, the shorter planks let you create a unique pattern with plenty of contrast.

The Species of Wood Affects the Aesthetics

All cabin grade flooring is not the same. The look that you’re going for depends on the type of wood that you buy.

Maple contains fewer knots than most other types of wood and may come with more short planks. It provides one of the cleanest finishes of all of the cabin grade planks.

Hickory features some of the most contrast. The background color ranges from almost white to dark honey, and the splits and knots are deep chocolate. The tone variation on hickory cabin grade flooring may even look splotchy and organic. Gray hues are also common in this species of wood.

Oak provides balance between color and contrast. It offers a medium honey background color, and the splits and knots are not as noticeable as they are in hickory.

Expect Some to Go to Waste

The average installer discards up to 20% of cabin grade planks. Keep this in mind so that you purchase enough to cover the entire area.

You’ll have to decide which defects are acceptable and which won’t work in your master plan. You can minimize much of the waste by placing less desirable boards in low-visibility areas, such as inside closets, near baseboards, beneath furniture and under rugs.

Look at the Floor as a Whole

A hardwood floor is supposed to look like a mosaic. When you look at individual planks, you may not think that they’ll go together well. But when you step back and look at the entire space, you will appreciate the way that the variety adds depth and interest to your décor.

Make sure that you open all of the boxes of flooring before you install it. This allows you to mix up the planks and produce the most pleasing results.

You might not like all of the nicks and blemishes on the planks. However, you can sand, stain and fill areas to produce a finish that you’re happy with. The knots and texture may show through stains, producing an interesting look that’s never too uniform.

Why Would You Choose Cabin Grade Flooring?

Cabin grade flooring has a rough-hewn appearance that many people aim to incorporate in their homes. The grading system doesn’t reflect the integrity of the wood; it just indicates that this is on the rustic side of the spectrum.

Some reasons that you might prefer cabin grade flooring are as follows:

  • Excellent value – This type of flooring costs up to 50% less than prime grade planks. It’s an affordable way to swap out your carpet or linoleum without derailing your budget.
  • Complements multiple styles – You don’t need a cabin to make this flooring look good. Cabin grade flooring can look vintage or surprisingly modern, depending on the way that it’s installed.
  • Unique character – It’s difficult to predict exactly how cabin grade floors will look before they are installed. Because the planks have so much variation, you can change the overall appearance by configuring them differently.
  • Perfect for busy spaces – Floors in high-traffic areas, such as mudrooms and playrooms, get lots of abuse. Damage will blend into cabin-grade flooring, but it could create obvious blemishes on other grades of hardwood.

All natural wood has imperfections. If you’re looking for a floor with character, you can capitalize on those flaws by using cabin grade planks. This type of flooring offers a distressed, rustic look that will never be identical to anyone else’s floors. It may not be the best option for people who want a uniform, even-looking floor. But if you install cabin grade floors, they’re sure to complement many styles of décor and start conversations.

What Flooring Goes with Hickory Cabinets?

Whenever you update an area in your home, you have to ask yourself whether it complements your existing décor. This is especially true when it comes to renovating your kitchen cabinets. The best flooring for hickory cabinets creates a cohesive look without being overstated or monochromatic.

What Do Hickory Cabinets Look Like?

Hickory is a popular wood for cabinets because of its strength and durability. Although it has a neutral tone, hickory is not boring. The wood has a distinctive grain, which provides visual interest.

Because of its informal nature, hickory is often used in rustic kitchens. However, it is versatile enough to work well in modern, minimalist, traditional and eclectic homes.

When pairing hickory cabinets with flooring, you should take into account the finish on the cabinets. Hickory is typically left natural. The lighter tones range from beige to gold. The darker areas can have orange, red or chocolate notes.

Sometimes, hickory cabinets are coated with a pale finish that is similar to a whitewash. This minimizes the dramatic variations in tone and provides a neutral backdrop for many flooring styles.

Identifying Warm or Cool Tones

Identifying whether your hickory cabinets contain warm or cool tones can guide you toward the right flooring selection. Warm tones are sunny and vibrant. They have an overall gold, yellow, orange, pink or red vibe. Cool hues have less of a honey or pink undertone. If your hickory cabinets are a cool shade, you might describe them as white or grayish.

Flooring With Warm Hues

Choosing flooring in warm tones will bring a cheery, sunny atmosphere to your kitchen. This is especially true if your hickory cabinets contain strong yellow, peach, pink or orange notes. However, you should avoid choosing flooring that matches your cabinets exactly. Too much of the same color will overpower your kitchen. If your flooring leans toward the warm side, make sure that it is either lighter or darker than the cabinets to break up the monotony.

Flooring With Cool Hues

Cool-toned flooring is usually a safe choice with hickory cabinets. If the cabinets are warm, the complimentary color of the flooring will provide the perfect contrast to balance it out. If the cabinets are cool, you’ll create a neutral palette that can be tweaked with accents and accessories.

Should Your Hickory Cabinets Match Your Floors?

While some interior decorators will tell you that your cabinets and floors should not match exactly, many people choose a uniform palette for their kitchen. You can match the finish of your cabinetry and floors as long as the rest of your décor breaks it up. A warm honey tone across the floors and cabinets can make your kitchen glow without dominating the space if your walls and furniture remain simple and neutral. White countertops and dining furniture with stainless steel appliances would complete this look.

If you can’t help but try to match your cabinets and flooring, you’ll be hard pressed to do so with hickory. The wood grain offers plenty of variation. It may have spots that are quite light and patterns that are very dark.

One piece of advice is to isolate one hue from the cabinetry and find flooring to match. If your cabinets are generally light with chestnut streaks running through them, you could go with chestnut flooring to draw out the design. On the other hand, you could select flooring that corresponds with the lighter beige tones.

Tone on Tone

Instead of matching the exact tones of your flooring and cabinets, consider a tone-on-tone look. This incorporates varying colors from the same family. However, the finishes can be markedly darker or lighter than one another. Depending on the undertones in your cabinets, you can go with a cream, yellow, orange, red or chocolate tone-on-tone aesthetic.

It doesn’t matter whether your floor is darker or lighter than your cabinets, though. Just try not to make it the same shade. You can also vary the type of material in the same color to break up a monochromatic environment with plenty of texture.

Add Some Drama

The more monochrome your kitchen is, the less dramatic the effect will be. Creating contrast will draw the eye to distinct areas and add interest. For example, you can punch up the prominence of the knots in the wood by choosing flooring with similar dark qualities.

You can also add drama by using shadowy colors for your flooring and accents. Consider installing a dark brown floor and black countertops. Alternatively, you can choose deep gray for your floors. This is an excellent way to generate a modern or cozy atmosphere in an otherwise rustic or informal kitchen.

Remember that you don’t have to stick with brown, white or gray for your flooring. Blue and violet hues contrast well with yellow-tinged hickory. Red or terra-cotta ceramic adds spice.

Consider the Pattern

Unless it has been painted, hickory wood generally has an obvious pattern. You don’t want the configuration of the wood to contrast with your floor. Therefore, you may want to select a flooring option with minimal patterning.

That doesn’t mean that you should install floors with a completely flat hue. In fact, monochrome flooring is difficult to come by unless you’re looking at vinyl or tile. Plus, totally flat color on the floors can be more eye-catching than the interesting design of the cabinets.

Look for flooring with a pattern that’s slightly more subtle than the grain on your cabinets. If your cabinets have minimal patterning, you can showcase a more dramatic texture on your floors. One way to do this is to create a monochromatic mosaic design using tiles. This will create a neutral backdrop for your cabinets without being bland.

What if Your Flooring Isn’t Wood?

Don’t assume that you have to stick with wood flooring if you have hickory cabinets. Vinyl, bamboo, tile and concrete are valid options for kitchen flooring.

No matter what material you choose, keep the warm/cool question in mind. Even white tile features a temperature variance. If you go with white flooring, hold it up to a piece of paper. If the flooring looks yellower than the paper, it is warm. If it looks grayer, it’s cool.

Marble and concrete look great with hickory cabinets because they highlight the neutral tones in the wood. Marble adds a sense of luxury to hickory cabinets, moderating the cottage vibe. Concrete ranges from rustic to modern, and it’s an edgy, unexpected way to underscore the cool colors in the cabinets.

When pairing hickory cabinets with flooring, you don’t want your kitchen to match so well that it looks flat. Still, you have a wide range of options, from tone-on-tone to high contrast. The best flooring stands up to your aesthetics and lifestyle and makes your home look and feel great.